This is the final post in the series describing my own writing process. I will admit that putting the ideas you have collected together for a public product can be very time-consuming, but less dependent on tools/services others have not encountered. I write mostly in Google docs. I write most blog posts in WordPress (the same tool that organizes and presents my posts to the public). I have experimented with other writing environments and for those wanting to try something different I will describe my favorite.
Scrivener is a tool for organizing resources and turning these resources into a final product. You can try the tool at no expense, but I did purchase my copy at the educational rate of $40.
I would describe Scrivener as a tool for larger projects that involve the organization of many resources, exploring what your final product might look like, and working on a product that will take some time to complete. I wrote this series of blog posts using Scrivener (the total of all the posts was a major project) and I wrote one edition of our textbook using this tool. Because of its system for storing and organizing resources, Scrivener could be used to explore the Smart Note writing process before fully investing in the multitool process I have described over the past several posts.
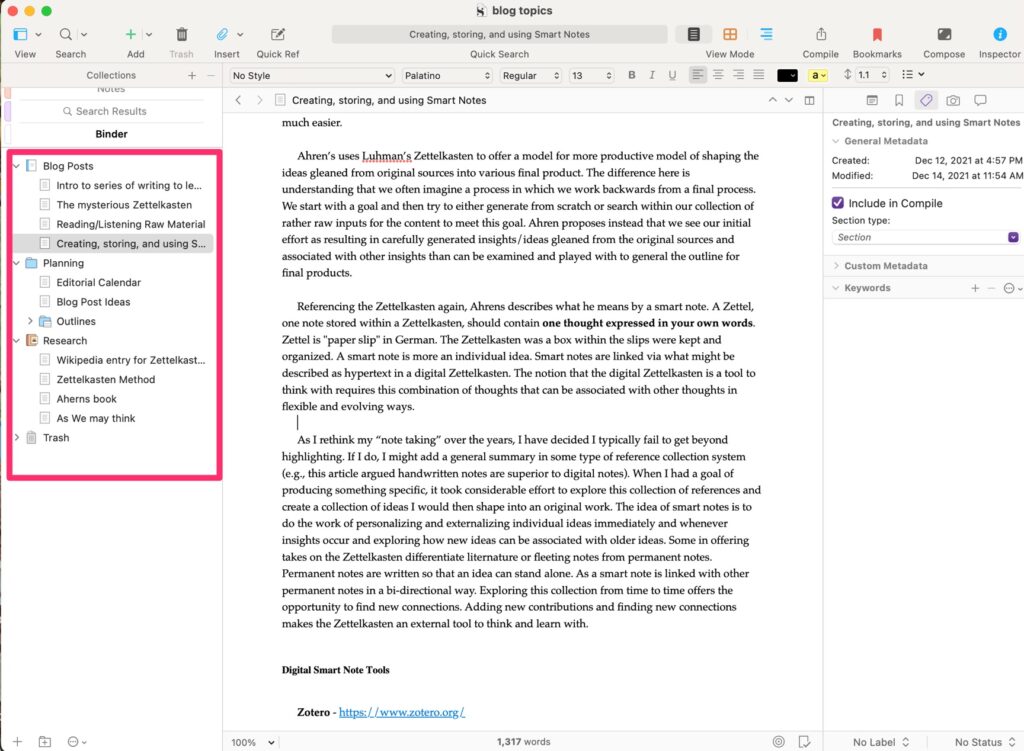
The three panel system shown below works this way. The binder (leftmost panel) provides access to content (background, original written products). The content selected appears in the middle panel (this happens to be the previous post in this series). The right-most panel provides access to metadata associated with the content in the middle panel (tags, notes, etc.).
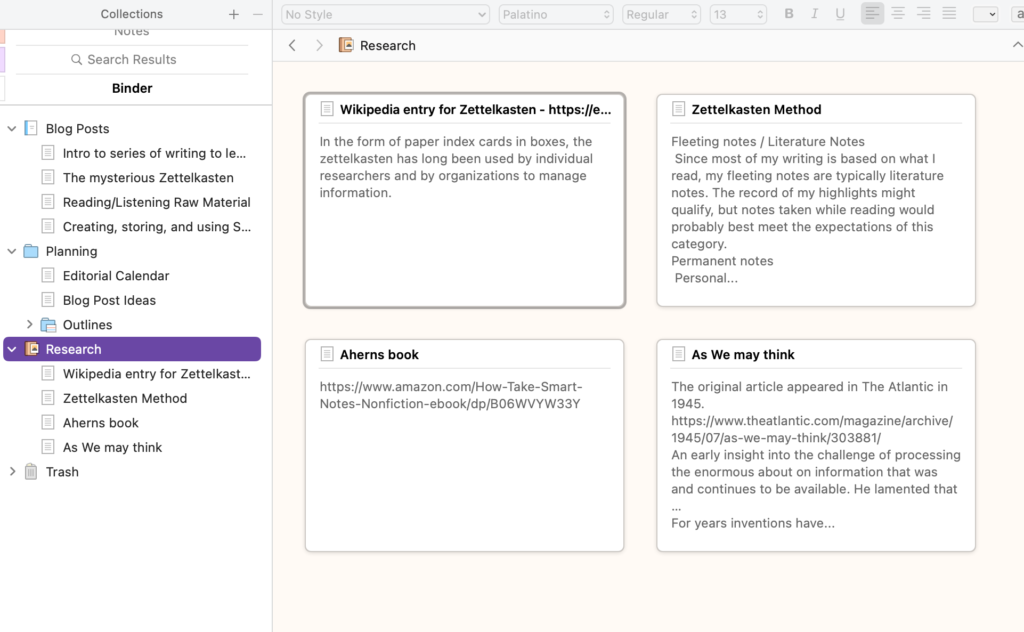
Scrivener has other tools (views) for working with and organizing ideas. The following is the corkboard which allows the identification of ideas that can then be organized and expanded into text.
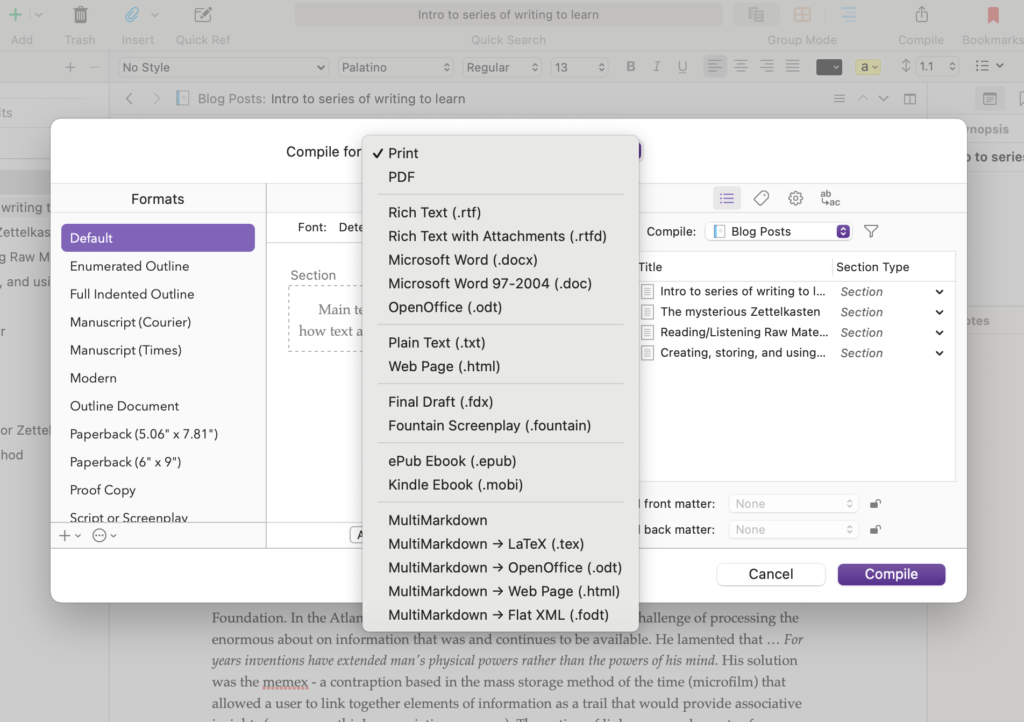
Scrivener is expandable and has an active community contributing templates for various types of products (blog posts, screenplays, scientific articles, etc.). Templates establish the organizational structure of the Binder. If you want, the content of a Scrivener project can be composed and output in formats for different purposes. For example, you can output the product you are working on in a format appropriate to upload to Kindle (.mobi). This is a very powerful tool I admit I use to introduce some variety into the time I spend writing. I have learned enough about the product that I can use it from time to time and move content back and forth to other tools without a lot of wasted time.
The impetus for writing this series of posts was a couple of insights I gained from Ahren’s book (How to take smart notes) which I have described in past posts (a link to the Amazon source for this book is included at the end of this post). I have tried to convey several of these insights in this series. Perhaps the most important insight was that writing is a process (not really that new) and what most think of as writing should begin earlier in this process. Smart notes are what we should be writing earlier.
It is not uncommon to engage in the highlighting and annotation processes I described in an earlier post and it is not uncommon to try to use the ideas selected by these processes in later writing. What is missing for most writers is the opportunity to identify, externalize (write), and organize individual ideas as an intermediate step that makes the transition from the input of reading to the output of writing much easier.
Ahren’s uses Luhman’s Zettelkasten to offer a model for a more productive model for shaping the ideas gleaned from original sources into various final products. The difference here is understanding that we often imagine a process in which we work backward from a final product. We start with a goal and then try to either generate from scratch or search within our collection of rather raw inputs for the content to meet this goal. Ahren proposes instead that we see our initial effort as resulting in carefully generated insights/ideas gleaned from the original sources and associated with other insights that can later be examined and played with to generate the outline for final products.
Referencing the Zettelkasten again, Ahrens describes what he means by a smart note. A Zettel, one note stored within a Zettelkasten, should contain one thought expressed in your own words. Zettel is “paper slip” in German. The Zettelkasten was a box within which the slips are kept and organized. A smart note is more an individual idea. Smart notes are linked via what might be described as hypertext in a digital Zettelkasten. The notion that the digital Zettelkasten is a tool to think with requires this combination of thoughts that can be associated with other thoughts in flexible and evolving ways.
As I rethink my “note-taking” over the years, I have decided I typically fail to get beyond highlighting. If I do, I might add a general summary in some type of reference collection system. When I had a goal of producing something specific, it took considerable effort to explore this collection of references and create a collection of ideas I would then shape into an original work. The idea of smart notes is to do the work of personalizing and externalizing individual ideas soon after the initial encounter while reading and exploring how new ideas can be associated with older ideas. Some in offering takes on the Zettelkasten differentiate literature or fleeting notes from permanent notes. Permanent notes are written so that an idea can stand alone. A smart note is linked with other permanent notes in a bi-directional way. Exploring this collection from time to time offers the opportunity to find new connections. Adding new contributions and finding new connections makes the Zettelkasten an external tool to think and learn with.
Zotero is a free tool, but provides a limited amount of online storage at the free level (300 MB). For 2 GB, you would pay $20 annually. Zotero allows the storage of a lot of different types of files including pdfs and web snapshots. If you store this type of information, 300MB will not be sufficient. I store all pdfs in other ways so I am waiting to see how fast the free storage capacity goes.
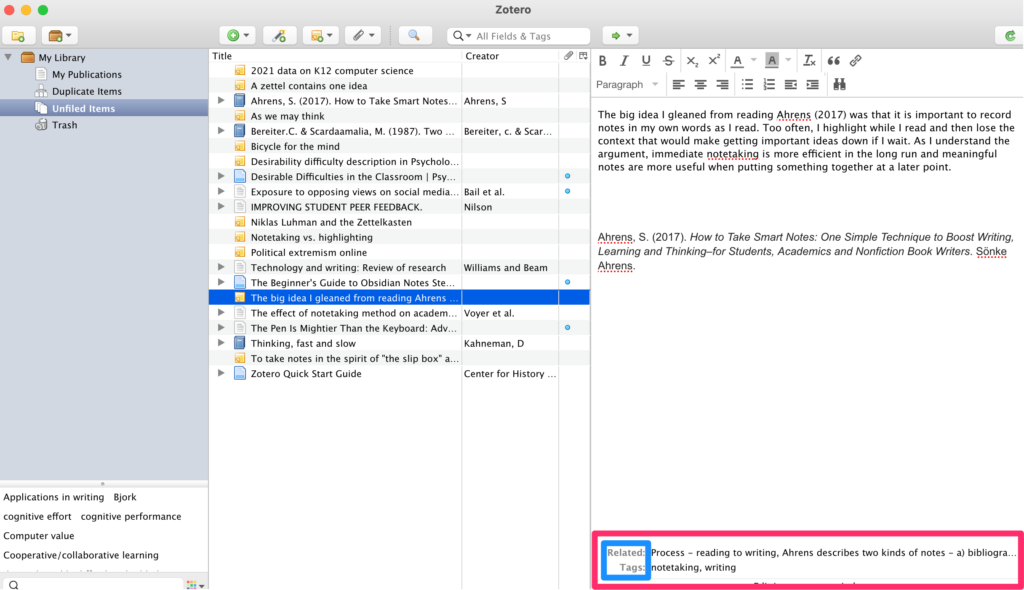
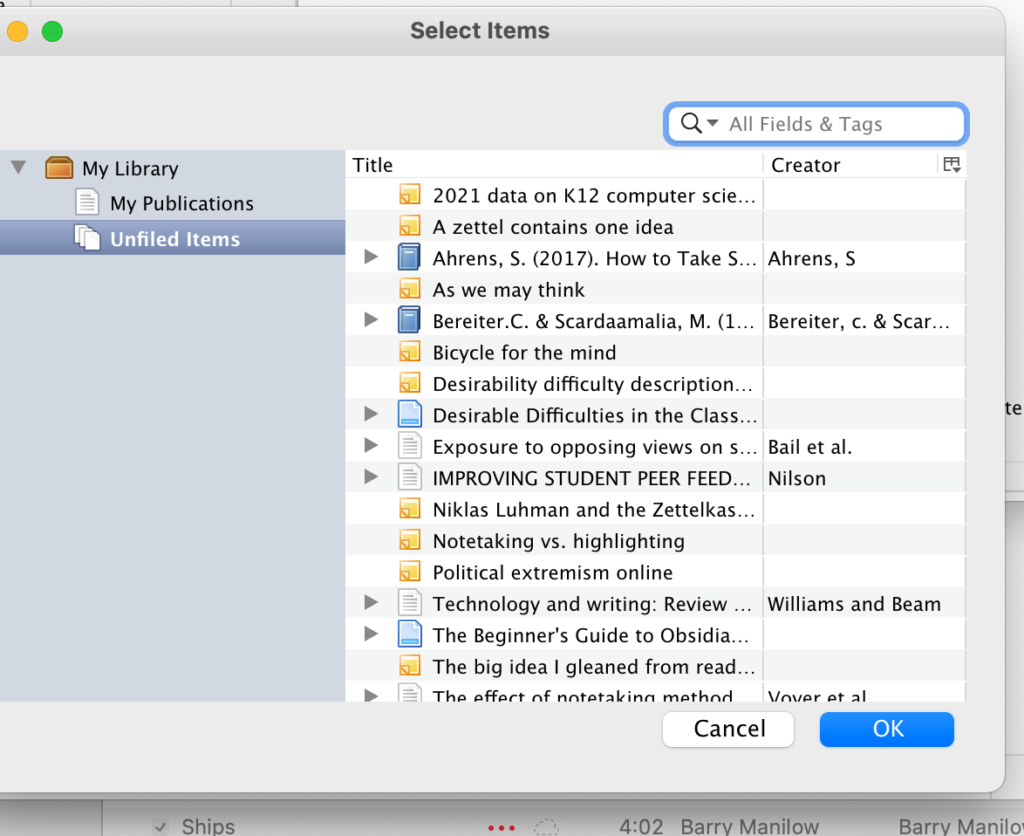
I am using Zotero to store my summary insights and references. I can store links to the other sources such as annotated files stored in Diigo (previous post). The right-hand panel in the image below shows what one of my notes looks like. The key to Zotero use are the additions stored in the area at the bottom (the red box). Here I can add tags and links to related notes in the system. A tag cloud also accumulates and can be seen at the bottom of the left-hand panel. So, this might be considered a version of a Zettelkasten and the idea would be to build this collection and periodically visit to explore ideas and add links among ideas.
Obsidian is another tool recommended as a Zettelkasten. It is a free tool and I can store the files it generates in a way that is local, but is also synched to the cloud (iCloud). This means I have cloud storage and that I can access my resources from other devices that access this same online storage.
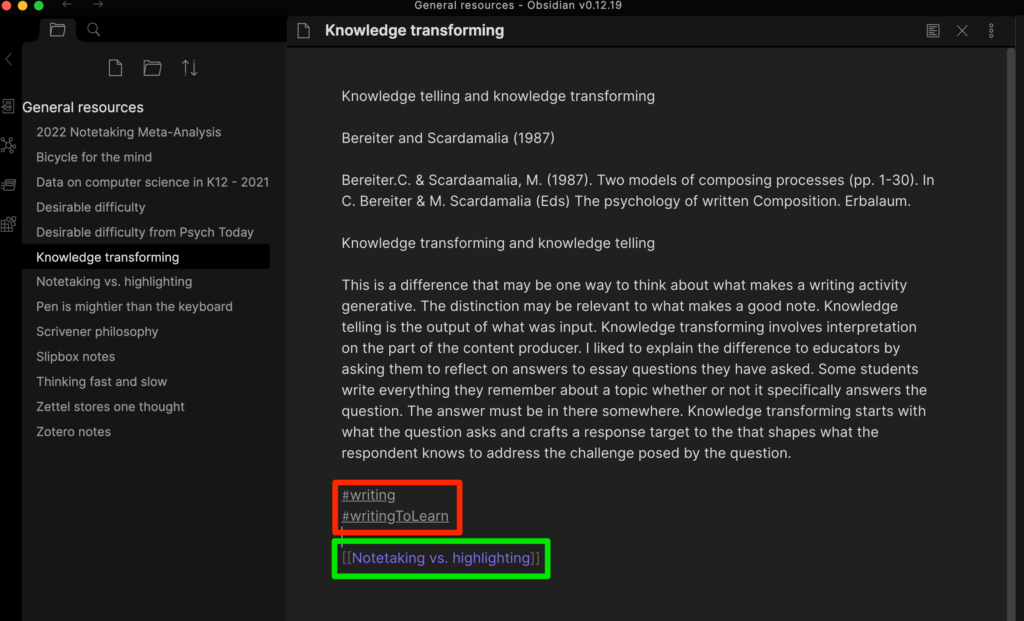
The files used in Obsidian are written in markdown text. A system such as this should be familiar to any older tech folks who used tags to add links and text styles in the early days of HTML use or wiki tools. You can see some of these tags if you look closely at the bottom of the top image. The red square surrounds tags that can serve as the target of searches (#tagname) and the green box surrounds an internal link to another note [[file name]]. Other tags provide external links, text style, etc. You can get by just learning three or four tags so adding these additions is not difficult.
While a markup system may seem primitive, the great advantage is that the files that are stored (each entry ends up as a separate file) can be read by pretty much any tool (e.g., word processing program, text editor). The concern is about longevity. Should something happen to Obsidian, the files stored in a safe way (locally and in the cloud) and can always be salvaged.
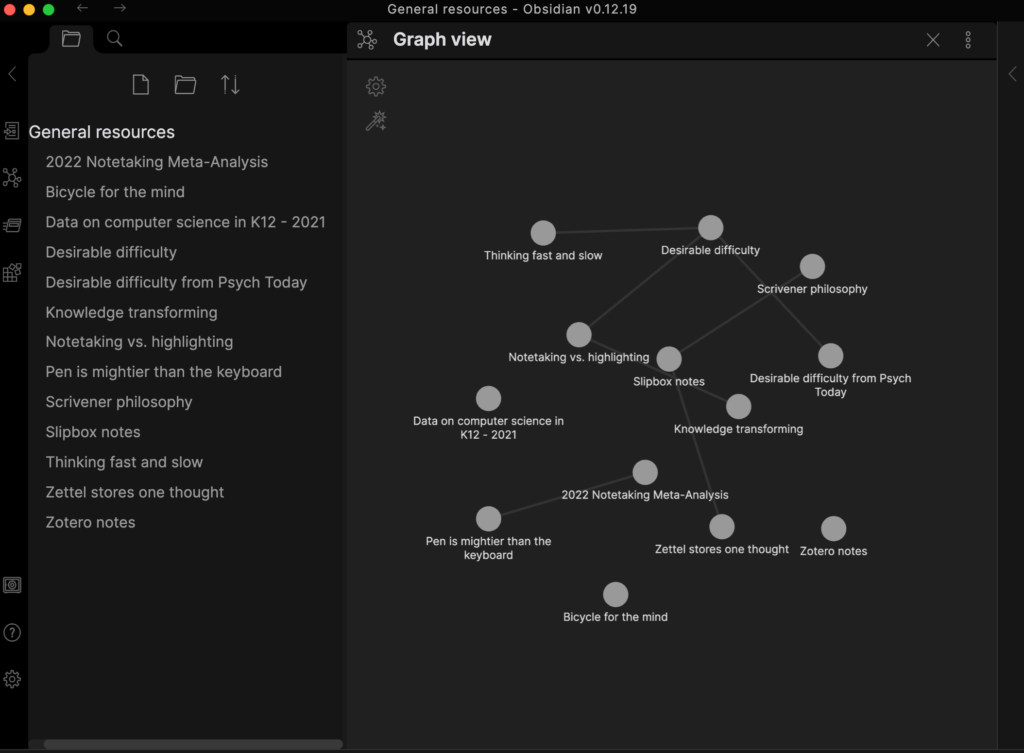
Obsidian creates backlinks any time two files are linked. It is possible to visually see and explore the system of files that is created (see below) and these visual representations can be refined using a filtering system.
The longevity issue
The idea of a Zettelkasten is intended to create a manageable repository of content that will exist for maybe decades (see the comment about text markup in my description of Obsidian). This may sound grandiose, but for any of us at the tail end of a career that involved information problem solving for several decades the struggle to transition from one system to another is real. I had notes on paper note cards in a box and a file cabinet filled with highlighted copies of journal articles with other articles still in the decades of journals on my office shelves. A collection of pdfs was the next stage. Then various systems such as EndNote for trying to manage the collection of pdfs. Now, I am trying something new. With digital content, I think there are advantages and ways to build on what you have and not start over.
Getting started
It is possible to be attracted to new tools and spend too large a proportion of time learning the tools. I see some role in the latter stages of my own career to be exploring tools so that others do not have to do this on their own. So, how would I get started? I think I would start with a pdf tool and a tool for organizing and saving ideas/insights. You could use Mendeley Desktop (pdfs) and either of the tools I have described here at no cost.
Little that I write comes originally from my own thoughts. Ideas mostly start with things I have read and occasionally heard. Giving credit when possible is a value I learned early.
My comments in this series are based on an analysis of my own writing process with an eye toward improvements I might make. This is not a new goal as I have experimented with aspects of this process and how I might support it with technology for years. I have explained the more immediate impetus in a previous post.
This post concerns the various tools I use to collect and process ideas from various inputs. The goal of what I am working on in my most recent process upgrade is to try to move aspects of writing earlier in this process. My intention is to use the note-taking capabilities of many of the tools that follow more aggressively and to feed these notes forward to the newest stage I will explain in the post that follows. The following material is organized by input source. You may have more of an interest in some of these inputs than others depending on how you contact information in your life,
Listening
I have included listening more based on past experiences than on present practices. I used to take notes during presentations I would attend. Often these presentations would occur at conferences I attended. If you are younger, you may be attending classes and taking notes as part of that type of formal learning environment.
The two tools I list here have an interesting capability I think most could benefit from applying. The tools record audio and link locations in the timeline of this audio to any notes that are taken. The benefit here is that should the notes be vague at later consideration, the original audio can easily be reviewed for clarification. I also suggest that when the note taker realizes that something is slipping past them they simply enter some marker in their notes – “I am confused here”.
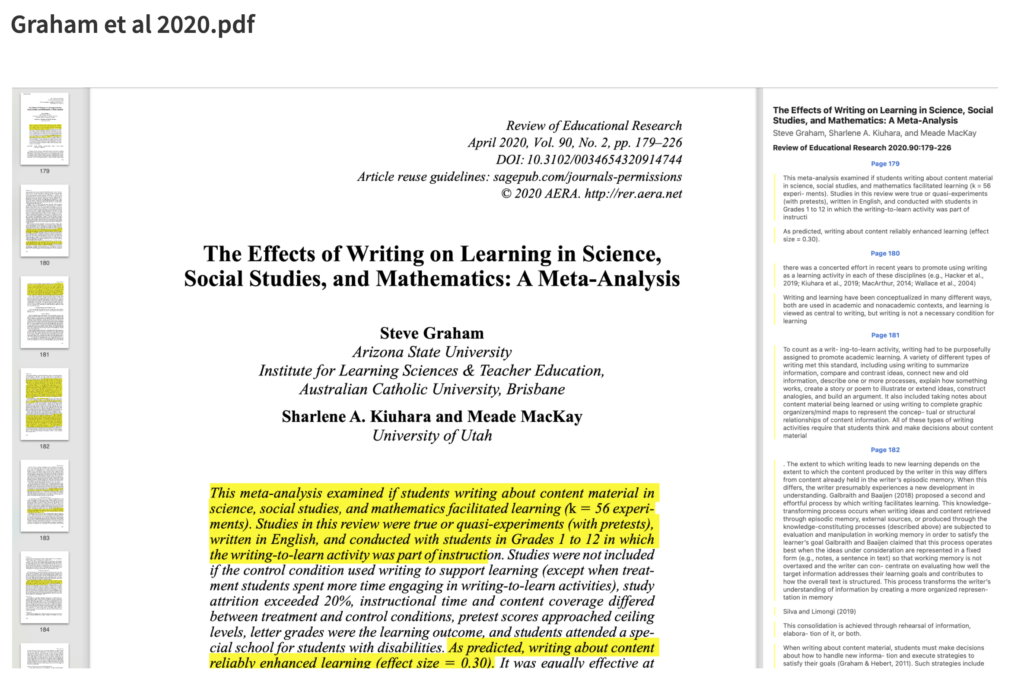
I am a retired academic so much of what I read and still write about is originally encountered in journal articles. For years now, university libraries offer online access to these journals allowing the download of the pdfs of articles. I used to joke that I would use my computer to download what I wanted to read before I would walk across my office to find the same article in a journal I had on my shelves. I used to use EndNote to read and highlight articles. I had issues synching the annotated content between my textbook computer which is the machine I prefer for writing and my iPad which is the machine I prefer for reading. After some experimentation, I settled on BookEnds and Highlights for these purposes. I use them together as each has advantages. The unique value of Highlights is that highlights and notes are easy to export as a separate document should you want to use this content separate from the original pdf (the image below is from Highlights). I believe these are primarily Apple tools and both require a subscription fee.
The following is the display when highlighting and annotating in Highlights. The highlighted content and notes generated appear in a separate panel on the right and can be exported.
Other pdfs
I do read other content as pdfs. My tool for this is Mendeley based in a more organized setting called the Mendeley Desktop. If you are trying to avoid paying for a service that both organizes and allows the annotation of pdfs, this would be my recommendation.
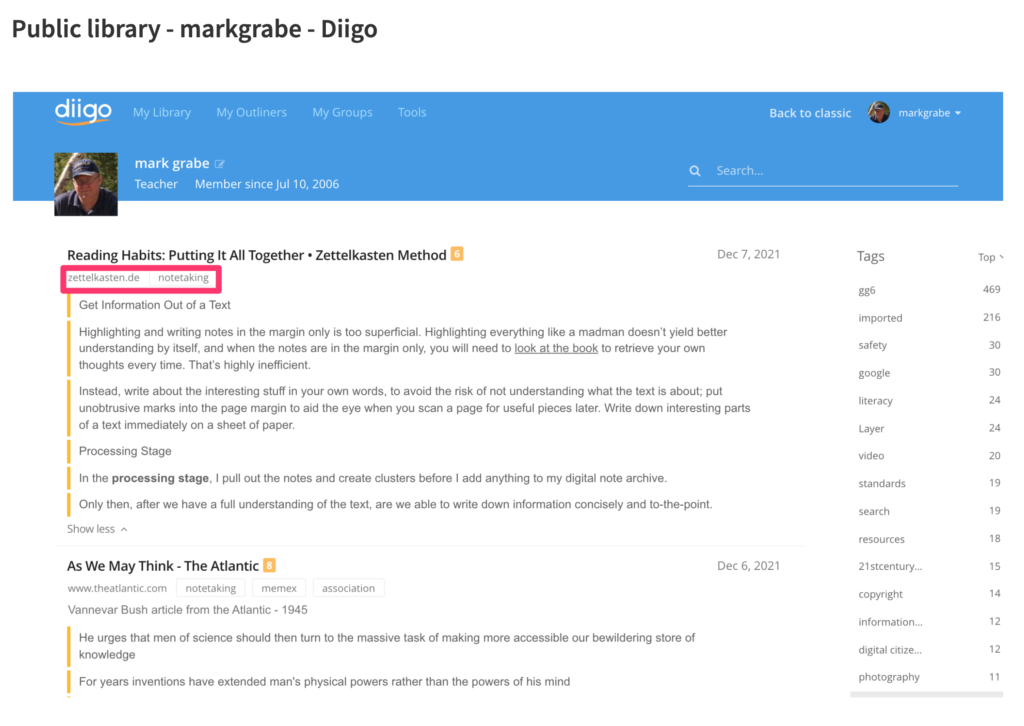
Diigo is considered a social bookmarking tool. It is social because stored bookmarks (and contents) can be made available to others. A user can set the default to private and then uncheck a box that would add the annotations/highlights for a given site to make the content public. The bookmark itself stores the web address of the original content, Highlights and annotations are stored as part of the bookmark. Bookmarks can be tagged (see terms within the red box) and these tags can be used to search for other bookmarks within the collection. This is a powerful tool I have used for years mostly when was focused on sharing resources with others. Lately, I have become more serious about the other opportunities (e.g., an outline tool that allows the organization of content from multiple bookmark content as an intermediary stage before writing). I offer access to my public notes in one of the links I provide here. I pay an annual fee for the Pro version of this tool. I could get by with the free version (e.g., I could delete each outline I construct to stay within the number of outlines allowed at the free level), but I am pushing myself to use more of the capabilities of this service.
I don’t think I have purchased more than one or two physical books in the past decade and in most cases, this is because I happened to be attending a book signing. I average purchasing about a book and a half a month in digital form. I use Amazon exclusively and while I understand other similar services are available I stick to one environment as a matter of convenience.
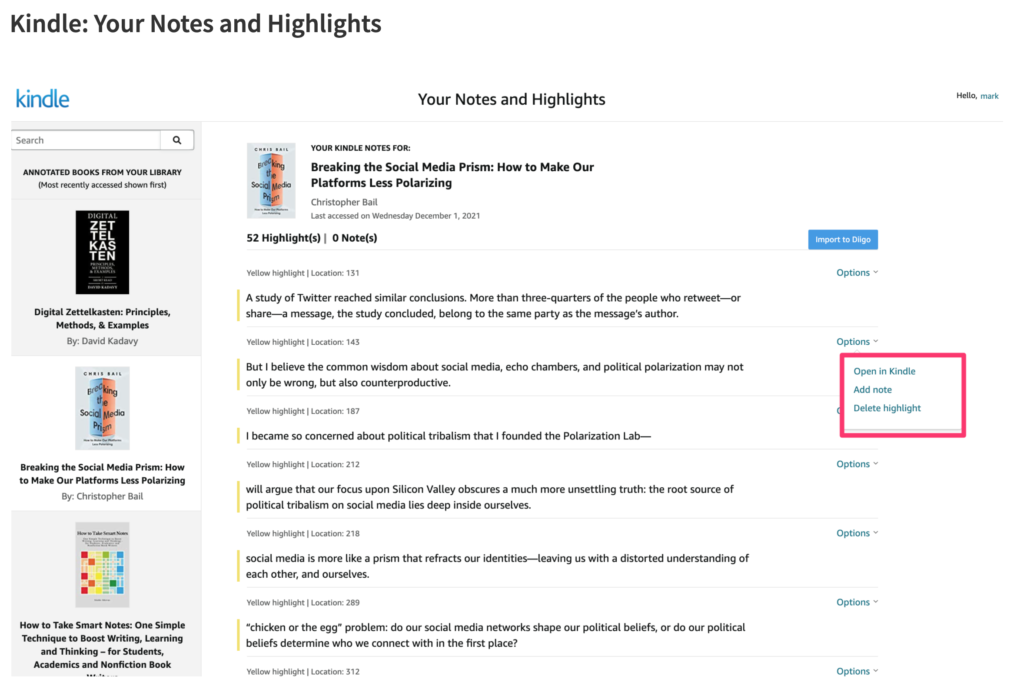
The Kindle (on one of several devices I use) allows highlighting and note-taking. What some may not realize is that Amazon stores all of your highlights and notes online and there are several ways to access this content.
Highlights and notes generated while reading a Kindle book can be exported. This content can be found online – https://read.amazon.com/ – and can be edited further (add a note, delete the highlight) online. Kindle and Diigo have a unique relationship in that those who pay for the Diigo service can send their highlights and notes from Kindle to Diigo with the click of a button (see the blue button – Import to Diigo) in the image that appears below.
One final comment – I think it is important to give some thought to sustainability. Services come and go and the process I am attending to describe in total assumes that value comes over an extended period of time. Some issues to consider. First, are resources stored in a format that is independent of the service using the resources. Pdfs seem to meet this goal. Another format, I will discuss in the next issue is markdown text. This is essentially a text file containing common symbols to trigger things like links and tags (e.g., [[]] and #). If the worst happens and a service goes away, pdfs and markdown files can be opened using several other tools. Second, store in multiple places and backup. I try to use services that generate content I can find on a local machine and also exists with reputable services “in the cloud”. I use DropBox and iCloud for online storage. I trust these services and at worst assume I would have some warning if I would have to find a different online storage service.
I have tried many methods for taking notes over the years. I probably started like many academics by reading scholarly journal articles in the journals I received through subscriptions, highlighting the articles as I read, and then maybe taking a few notes on a 3×5 card that I kept in a “recipe box” under one topic heading or another. With the arrival of technology, my approach shifted to storing a version of the note cards in one system or another and shifting from reading journal articles in journals to reading journal articles I could download from my library site as pdfs. When the Internet offered more content directly I added some bookmarking application to my approach to save the links to websites I wanted to remember.
The big idea I gleaned from reading Ahren’s (2017) book (see previous post) was that it is important to record notes in my own words as I read. Too often, I highlight while I read and then lost the context that is important in capturing big ideas. Any writing task required that I recapture the ideas by starting from the original source before integrating ideas in what was to become the final product. What Ahrens recommends might be described as starting a writing process earlier in the transition from primary sources to the final product. He described first generating fleeting or literature notes while reading and then permanent notes once the reading of a source was completed. As I rethink my “note-taking” over the years, I have decided I typically failed to make the transition from literature notes to permanent notes. Worse yet, too often my reading of a source only resulted in highlighting of the ideas that were not my own.
What Ahrens describes as a permanent note is clearly a form of writing. The idea is to create a personal summary or interpretation of a key idea that can stand alone and store such summaries in a certain way. What I mean by stand alone is that the permanent notes are not necessarily intended to end up becoming part of a final product that one already has in mind. The concept of smart notes (the title of his book) was that the ideas would be formulated and captured immediately and stored in such a way that they could be easily found and then organized with other such ideas to more efficiently create final products. I would describe this as moving part of the writing process earlier in the reading to written product workflow.
Knowledge transforming and knowledge telling
Ahrens argues that creating permanent notes as you encounter ideas you think are interesting is more than a precursor to writing. He suggests that this notion of generating a written note that reflects personal understanding and relating this note to other notes is a way to facilitate the learning process. You end up with both external and internal storage. I would suggest that cognitive psychologists call this form of writing a generative process. The permanent note versus the “literature” note reminds me of the distinction some scholars studying writing make between knowledge telling and knowledge transforming. The distinction may be relevant to what makes a good smart note. Knowledge telling is the output of part of what was the input. Your write a close approximation to what was heard or read. Highlighting would be a crude form of knowledge telling. Knowledge transforming involves interpretation on the part of the content producer. I liked to explain the difference to educators by asking them to reflect on student answers to essay questions they have asked. Some students write everything they remember about a topic whether or not it specifically answers the question. It is like they want to argue that the answer must be in there somewhere. Knowledge transforming starts with what the question asks and crafts a response that shapes what the respondent knows to address the challenge posed by the question. Knowledge transforming is a far better indication of understanding.
Luhman’s Zettelkasten
Ahren’s book and ideas are not his original creation, but based on the method of Niklas Luhman referred to as the Zettelkasten. I see various references to Luhman’s ideas lately and predict this will become “a thing” in education. As I understand the translation, a Zettelkasten is a box in which notes are stored and organized. Lehman called this a slip box. It is the form these notes take and how they are related to other notes in the box that is the key to what is described as a more productive workflow. I have included a video of Lehman working in his office using his slip box and a reference to a source describing the Zettelkasten for Beginners at the end of this post.
Where is this all going?
If you read my original post, you can anticipate that I will originally explain efforts to translate this method and the physical slip box into a workflow and applications that run on a computer. I will identify some of the tools/services I have used and some I have recently discovered that are suggested as ways to implement the Smart Note and Zettelkasten approach to writing and learning.
Sources
Ahrens, S. (2017). _How to Take Smart Notes: One Simple Technique to Boost Writing, Learning and Thinking–for Students, Academics and Nonfiction Book Writers.
Knowledge telling and knowledge transforming – Bereiter.C. & Scardaamalia, M. (1987). Two models of composing processes (pp. 1-30). In C. Bereiter & M. Scardamalia (Eds) The psychology of written Composition. Erbalaum.
I have a long term interest in student note-taking and how it might be improved. A somewhat shorter fascination has been the role of writing in content area learning and this is a topic I consider with a focus on the role of technology in a graduate course I teach. Recently, I read a book by Sonke Ahrens with the rather lengthy title – How to take smart notes: One simple technique to boost writing, learning and thinking – for students, academics and nonfiction book writers (reference included at the end of this post). I don’t think the title adequately conveys the breadth of what the book covers. I see it as a book about what learning is and the role writing can play in facilitating the process of learning. By including a consideration of several technology tools, the author brings together many of my interests.
I decided I would try to write several posts on this topic based on my own experiences and interests. These posts may not appear here sequentially, but I promise to offer several posts I will link in some way. My intent is to describe several digital tools I use or have used in what some might describe as a reading to writing workflow. Most academics have related experiences on this process. My focus on digital tools is more in keeping with the core focus of this blog.
A little history
Several of the authors I have read recently mention what I consider historical perspectives on the role of technology that were already familiar to me and that I have found intriguing.
In 1945 (no I did not read it immediately upon its publication), Vannevar Bush wrote an article for The Atlantic titled “As we may think”. Bush advocated for the importance of scientific research in the war effort and was partly responsible for what we now recognize as the National Science Foundation. In the Atlantic article, Bush offers early insight into the challenge of processing the enormous about of information that was and continues to be available. He lamented that … For years inventions have extended man’s physical powers rather than the powers of his mind. His solution was the memex – a hypothetical contraption based in the mass storage method of the time (microfilm). This device allowed a user to link together elements of information as a trail that would provide associative insights (as we may think – associative memory). The notion of links among elements of information is often recognized as very similar to the “world wide web” (internet) and the reason many tech folks recognize Bush and the fanaticized memex. The key idea here – technology be a tool for learning through the external representation of ideas and their connections.
Steve Jobs offered what became a famous analogy describing how he saw the potential of the personal computer. He described the efficiency of human movement as far inferior to other animals, but with the assistance of an external device (the bicycle) human movement was far more efficient. This is how he saw the potential benefit of the PC – a bicycle for the mind. At this point in time, the question might be how well does the present use of technology in education match with this goal? Does it facilitate the process of learning and the application of what has been learned?
Note: Adobe has replaced Spark tools with Adobe Express. Spark Video is part of Adobe Express.
Adobe Spark Video is a great tool for students to use to create videos. Adobe Spark is especially useful because it works through a web browser and hence is a great application for use with Chromebooks.
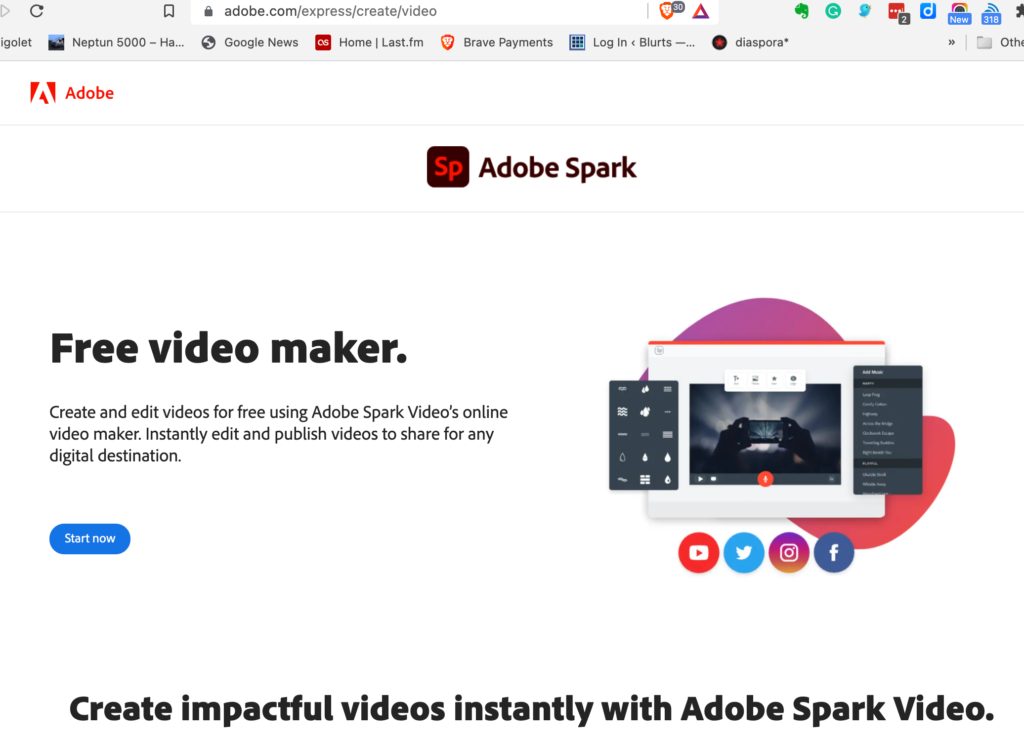
The following is the page you will encounter when you connect. You are going to want to create an account.
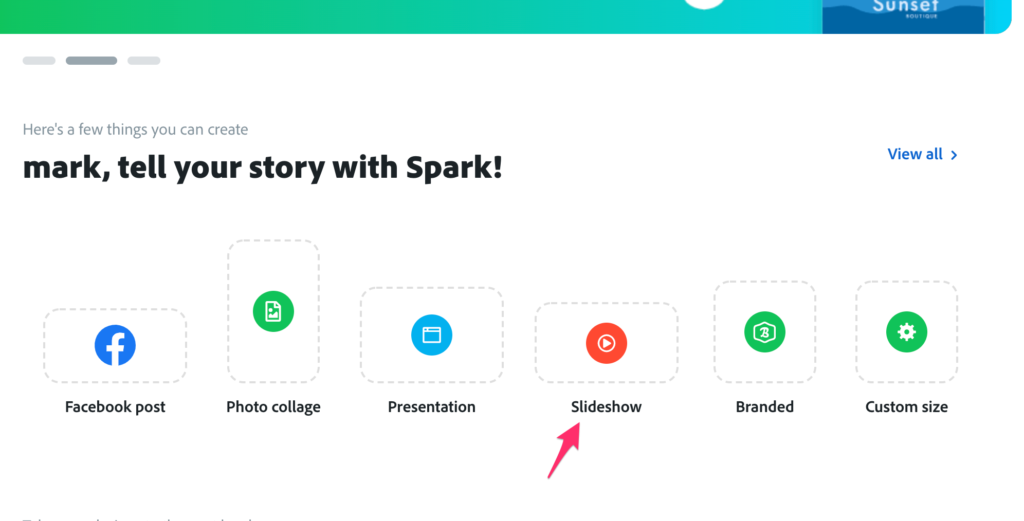
You can create various types of projects with Adobe Spark. My tutorial describes the slideshow.
The following video takes you through the basics of creating with Adobe Spark
Here is the final product from the project described above.
Once in a while, you encounter an idea that explains some things you have found puzzling. This is the case with the concept of “Desirable Difficulty“. This concept would be one way to understand my previous post on the advantages of taking notes by hand over taking notes on a laptop. Taking notes by hand is more demanding for most and learners compensate by summarizing content before recording. There are long term benefits to generating summary content over recording more verbatim information.
Bjork explains how a tendency to be misled into engaging in activities that seem to offer an immediate advantage may have less productive long term consequences. He differentiated retrieval strength and storage strength. Learning that is too easy (e.g., cramming) can result in an immediate advantage in retrieval strength, but may limit the development of storage strength. Long-term benefits depends on the development of storage strength.
This distinction can be applied to the immediate advantage of taking more complete verbatim notes over notes that require personal understanding (i.e., a summary).
As I hope is apparent, personal decisions are at the core of the problem. You tell students to space their study and not cram or work with their notes to create interpretations and not just verbatim copies of what was presented, but what easiest and falsely perceived to be more useful often win out.
One more comment – the suggestion of purposefully making things a bit more difficult must be carefully interpreted. The point is about engaging in cognitive processes that are more productive and perhaps more demanding and not to create needless struggles.
Bjork, R.A. (1994). Memory and metamemory considerations in the training of human beings. In J. Metcalfe & A. Shimamura (Eds.), Metacognition: Knowing about knowing (pp. 185-205). Cambridge, MA: MIT Press.



You must be logged in to post a comment.