Over the past few years, I have tried several different online tools to support my blogging and other writing tasks. Especially for blogging, I now pay for a subscription to Evernote. I have also tried OneNote, Google Keep, and Zoho Notebook. I find Evernote perfectly suited to what I do and find the subscription price reasonable. My subscription price is $43 a year at least according to the feature within iOS that keeps track of my subscriptions and what each costs. As I will explain in a bit, this amount is kind of confusing as the public subscription price seems to be $8 a month and I am not sure if I have an educator’s discount or am grandfathered in. I pay through Apple, but I doubt that would give me a lower rate.
I do keep track of similar services as a way to communicate to educators just what options are available within what I think of as a category of services – those allowing collection, organization, and annotation. I assume most educators have a need to collect online resources to support their instruction. Occasionally, this could also involve sharing resources with students and it would be nice if the same service could support both tasks.
I have been exploring the free level of Notion. To simply my explanation, I will outline one process for using Notion in this way and then explain some of the steps in greater detail. Notion is very flexible and this is just one simple strategy for how it might be used.
The process.
- Create an account
- Add the web clipper if working from a desktop machine. Set up sharing if working on a phone or tablet. With iOS this just means you activate the setting associated with sharing that allows the connection to the Notion app.
- Create a page in Notion
- Use the clipper or the app sharing technique to bring a page into the page you have created (think of this as a sub-page)
- Highlight content imported if desired
- Turn on sharing for a page and set desired permissions. Copy the share link and send it to those you want to provide access
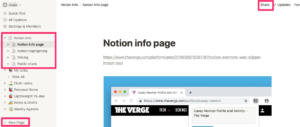
This image shows what Notion might look like after you have it set up and have been using it. Several things can be noted here. You can see two panels – the panel of the left shows existing pages and allows them to be moved about and embedded within other pages. I have used a red box to highlight several pages I have collected in preparation to describe Notion. One of these pages appears in the larger panel. You would highlight and read the content in the larger panel.
At the bottom of the left-hand panel you see a button for creating a new page (red box at bottom). This would be the button used if you wanted to first create a page within which other pages would appear.
At the top of this image, you see the “share” button within a red box.
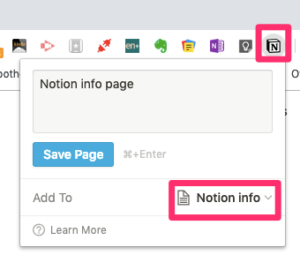
Content from other web sites is moved into Notion in different ways depending on whether you are working on a laptop or a mobile device. On a laptop, you will need to add the Notion extension to the Chrome browser. Only Chrome is supported as of this date. When the extension is added, the Notion icon appears in the browser menubar. You select this icon when you are browsing a web page you want to copy to Notion. A dropdown box will appear (see image) and you select the page on Notion within which you want to add the new content. On a mobile device (at least iOS devices), you use a browser to find the content you want to store and then use the share icon to share to the Notion app. On iOS, you must first add Notion to the share options iOS will access.
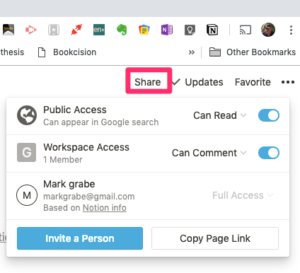
This image shows the share options within Notion (see first image to see the positioning of this icon). When the share icon is selected, you get this dropdown window for the to be shared page. You can set permissions from this window and also get the link to provide others access.
If you are interested, here is a link for a page I have shared publically.
https://www.notion.so/grabe/Notion-info-page2a557aa589a84824bc7c5859b8b36c49
209 total views


You must be logged in to post a comment.