Embellished Documents
Introduction
When we began writing about repurposing computer productivity tools as learning tools more than a dozen years ago, our conceptual system identified "embellished documents" as the simplest product such tools might allow learners to generate. At the time, we were describing a version of writing to learn in which students added images to word processor documents. As access to the Internet became readily available, these embellished documents could be put online by taking advantage of most word processing program's capacity to save documents out as HTML pages and related image files or by using low cost web page authoring software to create the content in the first place.
As we have developed this site, we initially focused on more complex participatory web tools. We originally described ways to generate complex hyperlinked documents (wikis) and and online sites that are incrementally extended by the addition of new and often topically diverse content over extended periods of time (blogs, microblogs).
There are, however, multiple sites that might be described as providing the opportunity to offer an online embellished or even interactive embellished document. The purpose of these sites is to allow participants to offer a "page" that is individually or collaboratively authored. It is our intent to describe a few of these sites here and in our correlated "tactics" section to describe how these "page" sites might be used in your classroom. The potential offerings for this section are quite numerous so our approach will be to focus on examples with a unique approach and perhaps expand as time allows and new services strike our fancy.
Glogster (Edu): Online posters
The educational version of (Glogster) has been described as the online equivalent of student created, classroom posters. Think in terms of the student-generated posters you have viewed in the hallways of elementary schools or perhaps the tri-fold posters used to explain student projects at a middle school science fair. The online equivalent, perhaps enhancement would be more appropriate, offers a space in which multimedia elements are combined to convey information.
Glogster structure
The educational version of Glogster was developed specifically to attract users from the educational community. The independence of Glogster EDU and Glogster is important in providing some distance from inappropriate content that can be encountered when using general purpose online services.
An educational Glogster account might be understood as a site originally registered by a teacher within which students have accounts. This hierarchical structure gives the teacher control of group membership, a convenient way to keep tabs on projects created by group members, and some control over exposure of projects to the general Internet audience.
Registering students
The basic (free) version of Glogster allows the registration of up to 100 students. We focus here on the basic version because this is likely the version that will be used in exploration. Student accounts can be created as part of the registration process or at a later time. It makes sense that you might want to explore Glogster yourself before involving others so we will limit our explanation to the addition of students to an existing account.

A section of the "dashboard" (the online page providing access to Glogster functions) provides access to information about registered students (Manage students) and the "button" that initiates the process of adding students. Login information for registered students will be sent to you at the email account you designated when registering.
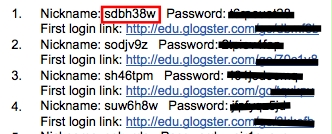
This information will provide a nickname and password for each student and a link for the initial login. The nicknames cannot be modified and consist of a meaningless combination of letters and numbers. The password can be modified by the instructor. The "gibberish" nickname which is required for logging in is a hassle to remember, but it serves security and safety functions.
Creating a glog
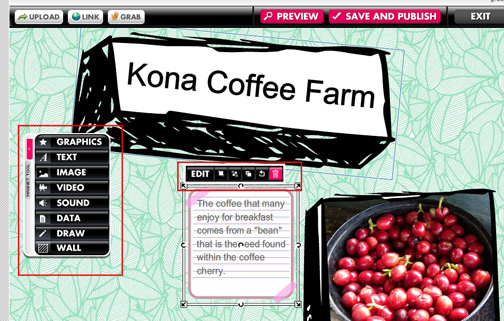
A glog (the term used for the page or poster) is constructed from multimedia components controlled from a magnet tool bar that should appear along the left-hand margin of the work area (see area in red rectangle). This toolbar is used to add components to the poster. Glogster relies on flash and vector graphics. In general, this means that the size and orientation of components can be modified and component can be moved about the poster space for ideal placement. Selecting an component should reveal a menu bar above that element with tools specific to that component category. For example, the screen capture appearing below shows a text component selected (the tool bar surrounded by a red box). Selecting the "EDIT" option would allow modification of text size and font.
Glogster offers pre-made components, but allows the upload or capture of images, sounds, and video. Content created outside of the Glogster environment can be added quite efficiently.
Use this link to view a short video demonstrating the creation of a glog.
Sample glog
Saving and sharing
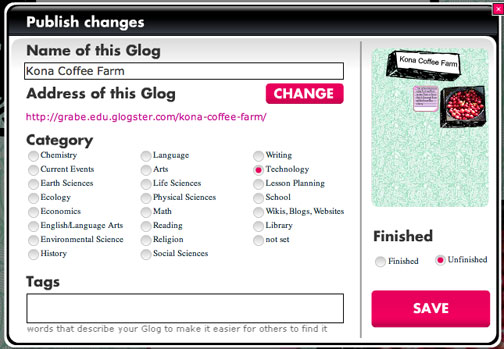
Near the top of the screen captured image we provide above, you will note the save and publish button. Student use of this button allows the student to save work in progress or to indicate that a project has been completed.
In theory, only the instructor can make a glog available to the general public (finished glogs are available to members of the class for viewing and comment), but we have noted that if a student shares the URL shown when the student saves a glog, others can access this content. Guessing a student nickname (remember it is gibberish) and the project title would be unlikely, but a student could allow others to view the site by sharing the URL without instructor intervention. Sometimes, it is probably just best to assume that student generated content is visible.
Last modified: