Word Processing in Google Docs
Word processing seems a reasonable place to begin this section. Writing is a core academic skill and productively comes into play in nearly every content area. As we argued in our section on the theoretical justification for online participatory applications (link), writing to learn also represents a well-research topic with proven benefits to students.
We assume most readers have considerable experience with desktop word processing tools and this familiarity will allow a superficial treatment of many corresponding features within the Google Docs word processing application. In most cases, our focus will be on showing you how to transfer what your existing skills into a slightly different work environment.
Getting Started - Registration
To use Google Docs, you must first register with Google. And, since our interest in Google Docs is primarily to encourage collaborative participation, those you intend to collaborate with (i.e. students) must also be registered with Google.
Registering with Google is accomplished by connecting to the Google home page (http://www.google.com ) and using the "Sign In" link. This link takes you to the sign in page and you then look carefully for the link "Create an account now".
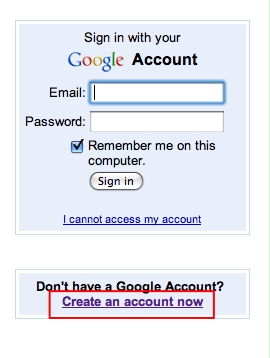
It does not seem intuitive that you go to the sign in page when you have yet to acquire an account, but this is the way it is. An email address is required as part of the process of creating an account and Google does allow users to designate an email service other than Gmail (the great email service from Google).
Getting Started - Connecting to Google Docs
There are several different ways to get to the Google Docs services. Google resources, even Google search, typically have a menu link appearing near the top of the page identified as "More". Selecting More will reveal several Google services and within this list there will be a link to "Documents".
You can also go directly to Google Docs using the URL - http://docs.google.com/. You may want to save this URL as a "favorite" (bookmark).
The Google Docs Start Page
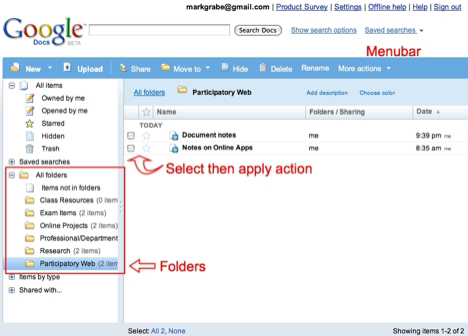
The Google Docs start page (Home page) is designed to be customized by the user. The image that appears below was generated using an account that has been active for some time so we might offer a better description of what the typical experience might look like.
Take a look at the following image and note the:
- menubar,
- collection of folders,
- files stored in one folder (participatory web), and
- check box associated with each file.
The best way to learn the basics of Google Docs may be to use our description to guide your exploration. Keep this web page open in one browser window and Google Docs in a second.
You might begin by taking a look at the drop down menus available from the menubar.
Under "New", you will discover options allowing the opening of a new document (word processing), spreadsheet or presentation and the option allowing the generation of new folders. We have already created and labeled the several folders that you see displayed in our representation of the site. If you use Google Docs for some time, you will likely want to retain a significant number of files and the folder system offers an effective way to keep this collection of files organized. Use new "document" when you want to begin writing a new project.
"Upload" allows the integration (and then editing) of projects you have started on a desktop machine. Multiple file formats are accepted. So, a student can write a draft in the lab using a desktop word processing program, upload this draft to Google docs, and continue working at home (either within Google docs or by downloading the file to a home computer). By the way, the "download" file action is available under "More Options".
Most of the other menubar "actions" are applied by selecting a file (the check box in front of the file or files is to select) and then selecting the action. For example, to move files into a newly created folder, you would locate and select the file and then use the "Move to" open to select the desired folder and reposition the file.
Writing/Editing
Once you open a new document you should be in familiar territory. We will offer some comments related to those features that work a little differently from what you may have experienced with a desktop application.
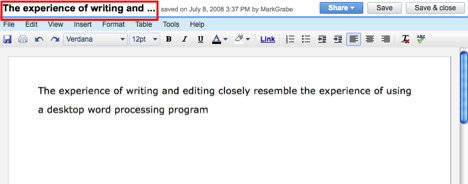
While you will note the presence of both a "Save" and a "Save and Close" button, Google Docs periodically saves your work automatically. We would still suggest you save your work as you would when working on the desktop. One of the confusing things about the automatic save feature is that a file name is automatically applied to your document. The first few words of anything you have written are used as a title (see red box area in following image). You can easily assign a preferred title by clicking in this area and entering a title.
Multimedia - Adding Other Media To a Text Document
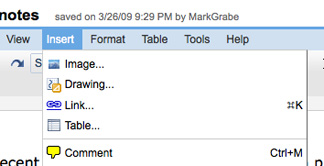
Like the word processing software that resides on your computer, Google Docs allows the insertion of content types other than text. The quickest way to investigate the options that are available is by open the pull down menu available from Insert (see menubar) and see what is available.
Inserting images and drawings
Google offers the options of inserting images or drawings. We are used to the opportunity to integrate graphics when using word processing programs on our personal computers and would likely feel limited if this capability were not availble when working online.
You may think of images and drawings as equivalent words for pictures or graphics, but these words do mean different things in the world of technology. At least two differences seem relevant - how the pictures are stored and how the pictures are created.
The topic of how a computer graphics is not of great relevance here. However, we have explained this different in other locations and offer a simple explanation of the difference if you are interested (storing graphics as images and drawings).
As far as how we create graphics goes, some graphics are captured (with a camera, a scanner, or as displayed on a computer monitored) and some are constructed. Google docs allows users to construct graphics within the Google docs environment using the "Drawing" tool and to important graphics created or captured elsewhere by inserting an image. There is another difference (the draw program generates vector graphics) and images are typically "bitmapped". We do discuss this distinction elsewhere (bitmap vs. vector graphics).
Drawing. To construct and then insert a drawing, you first open the drawing tool by selecting "Drawing" from the "Insert" menubar item. The drawing tool allows you to construct a graphic by positioning and then modifying shapes or lines, by adding text, and by applying color with the paint bucket tool. So, for example, the following graphic was created by adding a face and triangle from the shape collection and then adjusting the triangle to an appropriate size. Shapes can be positioned on top of each other and the color adjusted with the paint bucket tool. Labels can be added with the text tool.

Images. You can insert an image you have available on your computer into a document using the insert command. The image will be inserted at the location of the cursor. To add the image, select "image" under the "Insert" menubar option. You will be asked to "browse" your computer to identify the image you want to add. You will also be given the opportunity to select the size of the image (note you can also left click on the image once it has been inserted and drag a corner of the image to resize it to fit your needs), to position the image on the page (left, center, right), and to determine if you want text to flow around the image. Flowing text around an image (see below) allows you what some regard as a more polished look. You cannot control such features as the space around the image and you cannot add a caption under the image, but it is nice to be aware of this capability.
Name files with a purpose
This might be a good time to mention the importance of establishing naming conventions when having students share documents in an educational environment (we will get to sharing documents a little later). In my college classes, I have long allowed students to submit course papers as email attachments. You soon learn that requiring students to follow a naming convention saves you a lot of time. Without a naming convention, you soon encounter a dozen papers with the label "Assignment 1". A few students may even forget to add their names to the paper and so you soon have a real mess that takes a lot of time to unravel.
When sharing documents in the Google Docs environment, files end up appearing in the start pages of multiple individuals. So, if your students are requested to share their work with you, it is very possible several files with the same name would appear. A common convention is to have students label their documents with their names followed by a project name (e.g., Grabe - Assignment 1).
Getting files to your own computer
There are multiple ways to download a Google Docs file to the computer you are using. One opportunity is available as a "File" menu item. You will find that you can download a word processing documents in several formats (Word, PDF, RTF, HTML). While we trust Google and our work is probably far safer on Google servers than on our own equipment, as a precaution we do download files.
Backup your entire Google Docs collection
Revision history
The "revision history" of a document is available from both the "File" and "Tools" menu. You can return to a previous edition if necessary. Educators may find this feature for a reason not of value to others. When reviewing work shared by students, it may be helpful to examine the specific changes made in response to a review of a preliminary draft.
Sharing
The "Share" button reveals two options - "Publish as Web Page" and "Share With Others".
Publish as web page offers a simple way to make a finished product available to a broad audience. Select this option and the document will be a) transformed into a web page with a unique URL you can share or b) sent to a blog of your choice. Note that something you offer as a web page is not out of your control once published. You can unpublish at any time. You do need a Google account to view shared pages.
Here is a link to the content you are viewing now when shared as a web page through Google (we wrote the original version of this content in Google Docs).
Share with others
Google Docs offers the opportunity to share individual documents with specific individuals. A way to control who can view and/or modify student authored work is very important in an educational environment.
It may be helpful to think of sharing options as a type of hierarchy with individuals at different points on this hierarchy granted different privileges.
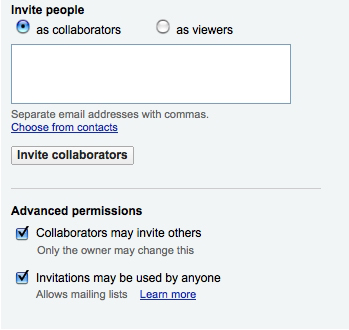
The owner creates a document and is the only individual who can delete the document. The owner can invite the participation of collaborators and offer access to viewers.
A collaborator can modify the document, invite the participation of other collaborators (if allowed by the owner), and offer access to viewers.
A viewer can access the document.
Owners, collaborators, and viewers must be registered Google users.
Privileges are granted by email (see following image) and a batch of individuals can be invited simultaneously.
Collaboration
A shared document is available from the Google Docs home page of multiple individuals. A shared document can be simultaneously edited by several individuals. So, any changes made are integrated and shared each time the document refreshes.
I work collaboratively with my own students to write reports and papers using Google Docs. When you use participatory web tools to get work done, you sometimes find ways to do things without taking advantage of a feature that you later learn might have been a perfect way to meet your needs. This has been my experience with the Comment feature.
We needed ways to communicate while working collaboratively on the draft of a paper. If one of us wanted to modify what had already been written, we needed a way to let the others know we had made a change or wanted to make a change. What we decided to do was to make all modifications in red text. It was fairly easy to make comments in red, to assign tasks (e.g., please find the full reference for these authors and add it to the bibliography), or to make changes which would be obvious to your colleagues. This was our system and it was an iterative process. We would periodically go through the manuscript to respond to a query included by a co-author or remove the comments after sometimes making adjustments. The color stood out and it is convenient to scan the manuscript to identify locations requiring your attention. This is not a bad system, but the Google designers probably intended that comments be used to serve similar functions.
Comments are also inserted by making a selection (Comment) available under the Insert menubar option. The comment appears at the location of the cursor.
You then click on the comment to enter text and also to reveal comment options (color options, delete, enter the comment text in the document). Note that in generating a comment, it obvious which individual included the comment and when the comment was added. There are probably many strategies for using comments (some of which I have already mentioned). You would not need to use comment color to identify the person generating the comment, but you might use comment color to indicate that an assigned task has been addressed. Comment color might indicate how strongly you feel about a suggestion (e.g., change this, it is inaccurate; you might add an example here). Groups work out their own conventions. Comments are not included when you print a document or save a Google document to the desktop of your own computer so they can be left in the document if leaving comments in would serve some useful purpose.
Working Offline
Sometimes advantages in certain situations represent disadvantages when the situation changes. Working with browser applications allows a user to work from multiple locations and different computers. However, there are occasions when Internet access is not available and then an online services becomes a liability. Of course, if the lack of access can be anticipated, Google Docs allows existing work to be downloaded to a specific computer.
Google now offers a more efficient way to download/upload work in a way that does not require prior planning. Using some software Google calls Google Gears, you can use Google Docs even when you have no Internet connection. Obviously, you would not want to add this capability to a computer that is not yours.
To use Google Docs offline, you first need to add some software to your personal computer. Look for the "Offline" link that should appear at the top of your Google Docs home page and select this link (see following image).
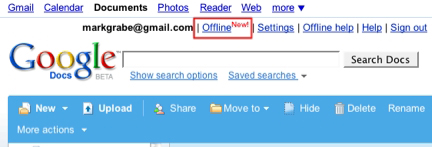
The instructions will explain how to download the required software (Google Gears). Google Docs can be access offline by entering http://docs.google.com as a URL in your browser (yes, even when you are not connected). The download process also allows the installation of a desktop icon that can be used to access Google Docs. If you use Google Docs a lot, allowing this icon to appear on the desktop is a reasonable thing to do.
Browser Application Alternatives
We think it is healthy when options are available and we describe Google Docs primarily because we have the most experience with these applications. Here are some options you might want to explore.
Acrobat.com is a collection of browser applications from Adobe. The word processing application is Buzzword.
Zoho offers a large collection of browser-based productivity and collaboration applications. The equivalent application here is Zoho Writer.
| Previous |