Resizing Images
Captured images are often too large for many applications. The resizing feature of an image editing program or service allows the image to be converted to a different image and file size while maintaining the same relative dimensions. A common application would be reducing the size of an image to insert in a web page.
Why resize images
Here is why resizing can be necessary. I have a Canon 7D and this camera captures very high resolution images. This camera has a 18 megapixel sensor that collections a great deal of data each time a picture is captured. The pixels making up this image can be tightly packed to produce a high quality representation (a high quality print - 300 pixels per inch) or less tightly packed to produce a large picture (images on the web are often approximately 70 pixels per inch). So, if I just take an image from my camera saved as a jpg and insert this image in a web page, the image would be approximately 72 inches by 48 images.
What you often want to do is display the image at a reasonable size while maintaining the pixels per inch at a reasonable density. This is what resizing the image accomplishes. To illustrate, the following image was resized from the original to 6.5 x 4.33 inches at 72 pixels per inch. You can get a sense of the actual size of the original image at 72 pixels per inch from the second image.


Playing with an image file that contains this much information is great fun because the detail that can be revealed is quite impressive. However, sometimes what you need is a way to resize the image so that it can be presented in a practical way. This is why knowing how to resize images is essential.
Changing the resolution of an image.
My tool of choice for image editing on a computer is Adobe Photoshop Elements (about $100).
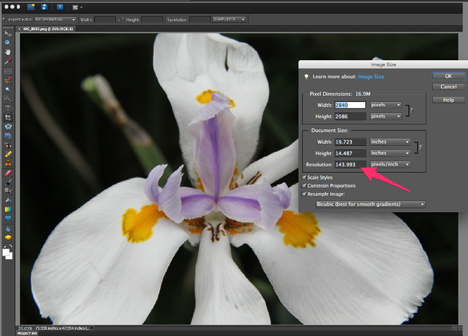
The image that appears below shows how this software allows the resolution and image size to be adjusted. Resize image is a menubar option.

I use the app Art Studio to modify image size on the iPad. ($5)
