I haven’t used iMovie in a long time so when a new version for iOS was released promising a Magic Movie maker I had to give it a try. The update added two new features – Magic Movie and Storyboards. The word “magic” intrigued me and I thoughts of shoveling in a bunch of media files and having a program create an imaginative creation from these inputs. If you are a Google Photos user, you know this service randomly creates interesting “highlights reels” from images the AI selects from your collection. I imagined Magic Movie would do something similar, but better. This turned out not to be the case, but the Magic Movie option is still pretty cool.
The hype for Magic Movie does mention AI and suggests you can identify a collection of clips and photos from your account and it will create a movie. This is kind of true, but you do end up taking many actions and making many decisions to create the final product. We just returned from spending the winter months in Hawaii and I have hundreds of photos and video clips. These circumstances seemed perfect to see what Magic Movie could do. I decided to concentrate on whale watching based on two excursions with this purpose.
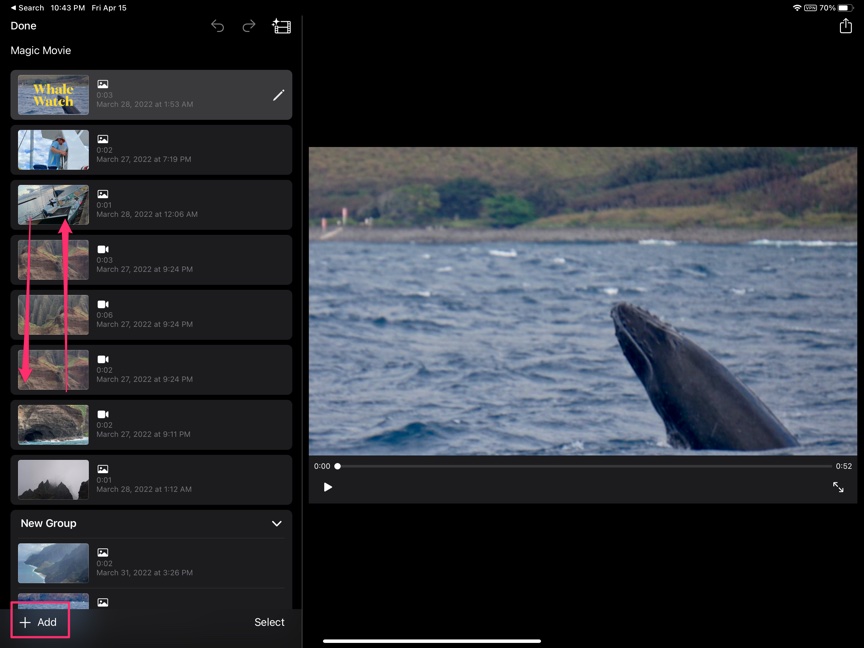
The Magic Movie process is pretty simple. You do identify the images and clips you want to include in a movie. Magic Movie does not really create a story from these clips. Once uploaded, you order the clips in a way that makes sense. The clips appear in an order based I think on the times the images were captured. I suppose this order is the assumed order of your story, but in my case combining two different trips and adding specific photos afterward (e.g., a picture of the boat), the times of the images did not tell a story. You drag thumbnails of the clips into the order you want. The AI will select a display length for each click and for the videos this will be quite short. You can expand the time for the videos to more of their actual length if you want. You also can add additional material once you see what the first effort looks like. The image below shows the work area – the screen will play the movie or display a specific clip. The left side of the work window shows the thumbnails that can reorder. The + button at the bottom allows you to add new content. You can add text on screens you select and add stock music or narration in the background.

The following video was my finished product. It is about a minute long and could have been stretched to about double this length by playing all videos included to full length. iMovie is not a tool for modifying the individual clips or images so any adjustments would have to be made before the content was included in the movie. No images were adjusted for this demo so some images may be tilted. If I knew I was going to create a composite from my video clips, I would have taken everything in the horizontal orientation. You will see that the alignment of the clips varies, but iMovie accepts both orientations, The process goes very quickly and is a convenient way to integrate content you have selected.
Magic Movie is easy to learn and use and classroom use would not require that students spend a great deal of time learning the software.
8 total views , 1 views today

You must be logged in to post a comment.